While your team is still having its initial meeting to generate and rate project assumptions, it’s a good idea to build your CheckPoint plan. This consists of looking at each red “Danger” and yellow “Caution” assumption and deciding who will perform one or more investigative tasks to drive the assumption from uncertainty to certainty.
You begin with these three steps:
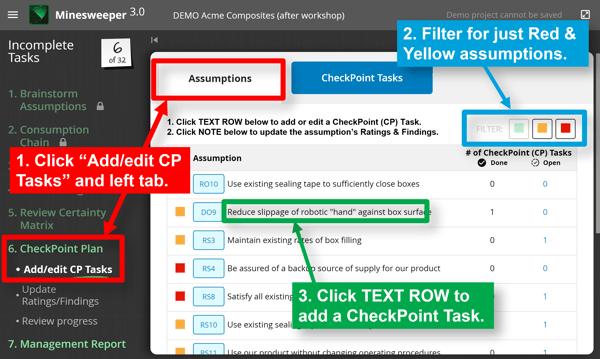
- On the left-side, click Step 6: CheckPoint Plan > Add/edit CP Tasks and ensure the left tab (Assumptions) is selected, not the right tab (CheckPoint Tasks). This lets you view all your assumptions. (See red notes in illustration below.)
- There’s generally no need to pursue green “Safe” assumptions, so check that the filter is set to only display red and yellow assumptions. (See blue notes in illustration.)
- One by one, review your assumptions and click the assumption text to navigate to a page where you’ll create CheckPoint tasks for each. In this case, imagine your team wants to create CheckPoint tasks for the assumption, DO9. You would click the assumption text, “Reduce slippage of robotic ‘hand’ against box surface.” (See green notes in illustration.)
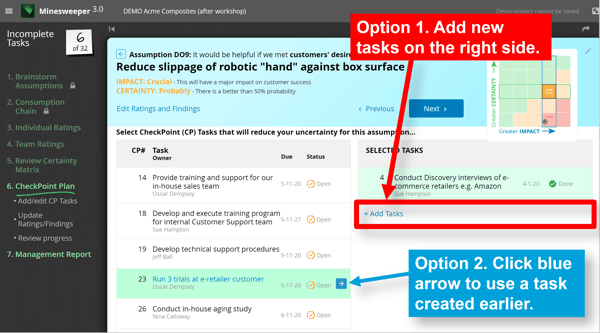
When you click an assumption text row, you navigate to the view shown below. You now have two options for adding CheckPoint Tasks:
- Add a new task: To create a new task, just click “+Add Tasks” on the right side. (See red notes in illustration below.)
- Use a pre-existing task: It’s common for one task to increase certainty for more than one assumption. So look on the left side of this page to see if any tasks you created earlier could help. If you see one that could increase certainty for this assumption, just highlight it and click the blue arrow… which will move the task to the right side. (See blue notes in illustration.)
For any task—one newly created on the right-side or a previously created on the left-side—you can easily view and edit it. Just click the task and you’ll see a pop-up window that lets you name the task, describe it, assign an owner, give it a due date, and change the status between “Open” and “Done.” See illustration below.

Keywords: CheckPoint tasks, CP tasks, CheckPoint plan, Assumptions tab, Add task, Add CP task, new task, pre-existing task, popup task window