If you are new to Discovery interviews, we strongly suggest you go to www.blueprintingcenter.com > e-Learning and watch e-module 15: Discovery Interviews. You’ll watch Meg Wheaton and her fictional Acme Resins team conduct the five parts of a Discovery interview—plus opening and closing—in 7 short videos. This will give you a “mental script” that you can fall back on during your interview: Until you build your own personalized approach, you’ll appreciate having “Meg’s voice” as a default. (Also consider watching other interview simulations—with good and bad practices—in e-modules 19, 21, and 22.)
Here are some suggestions for a highly professional, customer-impressing Discovery interview:
- Setup: Arrive 15 minutes early to set up in your customer's conference room. Tell your contact, "We'd like to arrive early to set up... so we don't waste your people's time." This lets you focus on the customers when they arrive... not getting the projector to work. Open Blueprinter at www.blueprintingcenter.com > Blueprinter software. Open your project, open Tool 2.5, and click on the name of the company you're interviewing. When you see the white Discovery Noteboard on your laptop, it's OK to plug into the digital projector or LCD screen. It's wise to bring a portable internet hot-spot... or arrange beforehand to use your customer's guest internet. No internet? You can still conduct the interview offline. But be sure to read this BlueHelp article to be prepared: How can I use Blueprinter software while offline? In a nutshell, make sure you a) don't log out of www.blueprintingcenter.com beforehand, b) don't clear your internet memory cache, and c) use the same internet browser during the interview as when you last saved.
- Opening: Use the top of Side 2 of the Discovery Interview Quick-Start Card to cover these three points: a) the Purpose of our meeting, b) why we’re using a digital Projector, and c) the Agenda we’ll be using. Of course, you’ll customize the rest of your opening to fit the occasion. If it’s a familiar customer, you probably have some friendly “catching up” to do. If it’s an unfamiliar customer, consider giving them a very brief overview of who you are.
- Current State: Limit yourself to just 2 or 3 questions here… and no more than 10-15 minutes. Otherwise, this can start to feel like a boring questionnaire. Some teams think the purpose of these questions is to “extract” information from the customer, but that’s not it. The real purpose is to put the customer at ease, before they are facing a whole screen of blank yellow sticky notes. If you ask them questions where they are the master and you are the student… you’re on the right track. (For instance, “How does your company view this trend…”) For more, see the BlueHelp article, How to create & use Current State questions.
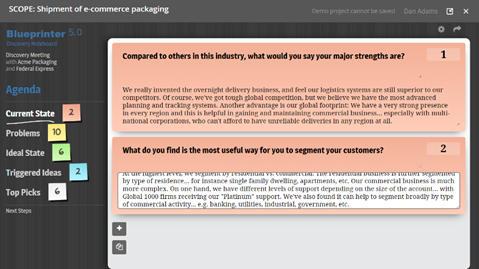
- Problems: Begin this section by letting them know the rest of the interview isn’t about any specific questions you have… but rather whatever is important to them that they would like you to know. In some cultures, you may want to replace the agenda item, “Problems” with a different word, e.g. “Issues” or “Challenges.” You can do this by going to Settings > Language Converter. Stay in the yellow sticky note “Problems” section as long as the customer keeps offering new outcomes. If the ideas start “drying up,” you can say, “Please take another 2-3 minutes to jot down any last problems you can think of… and then we’ll collect them on the screen before moving to the next section.”
- Ideal State: You can transition to this by saying, “Can you think of anything you’d like to see that you’re not getting today?” Don’t be surprised if you hear some of the same outcomes you heard in the Problems section. Just probe a bit more to make sure you understand it. If a Problem comes up in the green Ideal State section (or vice-versa), should you change the color of the sticky note? You can if you think it would make the customer more comfortable. But you won’t care later what color the sticky was: You’ll just data mine for outcomes, regardless of how you uncovered them.
- Triggered Ideas: Don’t feel bad if you run out of time before getting to this section: If the customer was giving you lots of Problems and Ideal State outcomes, it was a successful interview. In some cases, you may want to purposely finish these earlier sections, though, to give time for Triggered Ideas. This is can be the case if your customer is in a “paradigm rut,” and you want to encourage different thinking. For more, see the BlueHelp article, How to use Trigger Maps. You’ll first create one or more Trigger Maps in Blueprinter Tool 2.3: Plan Questions & Triggers, and then select one in that interview’s Prep Sheet (in Blueprinter Tool 2.1 or 2.5). When you click the display toggle during the Discovery interview under “Triggered Ideas,” your Trigger Map will appear below, with a row of blue sticky notes above it. You can edit the Trigger Map if the customer has suggestions… but your main intent is to stimulate more outcomes, which you’ll enter in the blue sticky notes.
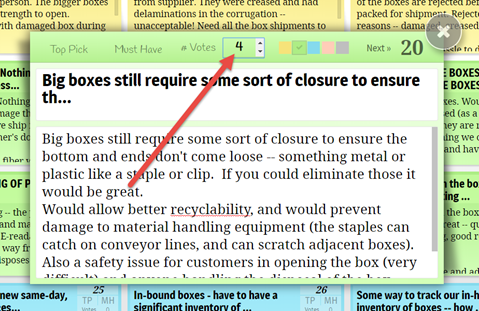
- Top Picks: Allow about 20 minutes at the end of the interview for this. Ask the customer to identify 5-to-10 Top Picks… the outcomes they’d most like to see improved. For a more formal “democratic” approach, you can have each customer privately write down the numbers of their favorite sticky notes, and then use the “Vote” area to tally the number of customer votes. Then use the Sort function at the top of the Discovery Noteboard to rank them, with the highest vote-getters at the top. Once you’ve marked the desired sticky notes as “TP,” click “Top Picks” in the left-side agenda… which isolates just the TP sticky notes. Now draft Outcome Statements for each sticky note, e.g. “Minimize time required to complete set up." For more, see the BlueTool article, How to select Top Picks.
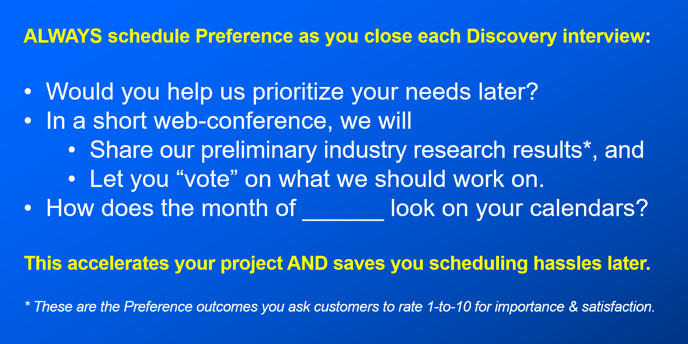
- Closing: At the end of a Discovery interview, cover at least these three elements: 1) Thank them for their time. 2) Ask if they’d like a copy of the interview notes after you do some clean-up work. (You can easily create a PDF using the export command on the Discovery Noteboard.) 3) Discuss ways to follow-up with them. Especially important: Schedule your Preference interview with them now!
Keywords: Discovery interview, conduct Discovery interview, Discovery interview tips, parts of Discovery interview, setup, opening, Current State, Problems, Ideal State, Triggered Ideas, Top Picks, closing, Discovery interview refresher, schedule Preference, setup Preference