Many of your debriefing upgrades will be made directly in your Discovery interview sticky notes… where you’ll correct typos, expand acronyms, etc. But there are other places in your Blueprinter software you should use as well. To make sure you don’t miss them, open your software to Blueprinter Tool 2.6: Debrief and Follow-up (at www.blueprintingcenter.com > Blueprinter software). Here you’ll be guided through the following steps:
-
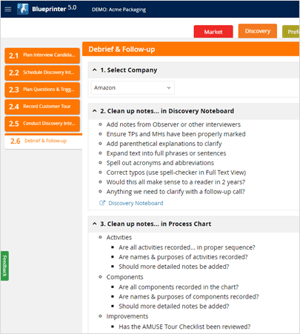 Select company: Click the name of the company you just interviewed.
 - Clean up notes… in Discovery Noteboard: Here you’ll find a helpful list of items to clean up in your Discovery Noteboard… similar to the tips you saw in the Debriefing Checklist. Just click “Discovery Noteboard” to begin making these upgrades to your Discovery sticky notes.
- Clean up notes… in Process Chart: This has helpful tips on making your Customer Tour Process Chart as complete as possible.
- Conclusions… in Prep Sheet: You’ve already used the Prep Sheet to, well, prep yourself for the interview. But this is also a good place to capture notes after the interview. These can include improving each person’s role, upgrading overall team performance, recording confidential notes that wouldn’t have been appropriate to display during the interview, and overall conclusions about the meeting, customer and possible course corrections to make.
- Next Steps… in Prep Sheet: Finally, you’ll record your next steps… which are largely about how you will continue to engage your customer post-interview. (See next section.) You have three opportunities to record next steps:
- If you know of a next-step before the interview—e.g. “clean up notes and send to customer”—you can pre-load these next steps into the Prep Sheet for this interview.
- At the end of the interview, you can click “Next Steps” in the left-side agenda and record any next steps you and the customer would like while you’re still together.
- After the interview, you and your team can record more next steps in the Prep Sheet.
Note that all next steps—regardless of where and when you enter them—are collected in the Prep Sheet for this interview.
For more on this topic, view e-Learning module 18: Debriefing after Interviews at www.blueprintingcenter.com > e-Learning.
Keywords: debrief after interview, Debriefing Checklist, Discovery interview debriefing, clean up interview notes, next steps, Prep Sheet