Blueprinter Tool 2.1 has three areas to help you plan your Discovery interviews: Settings, Interview Candidates, and Prep Sheet. The “Settings” section lets you create “descriptors,” to later characterize each company you’ll interview. These will prove especially useful after Preference interviews, so you can analyze your market segment for possible sub-segments (such as regional differences).
In “Settings,” you define the regions your interviewees are in, as well as the various points they’ll reside along the value chain (e.g. customer, customers’ customer, distributor, etc.). You also have an optional “Other” section for other descriptors that might characterize differences between companies. Finally, you can define the different job functions you plan to interview within each company.
The software will keep track of how many interviews you’ve targeted, scheduled or finished for each descriptor. This warns you if, for instance, you haven’t interviewed enough companies in Europe yet.
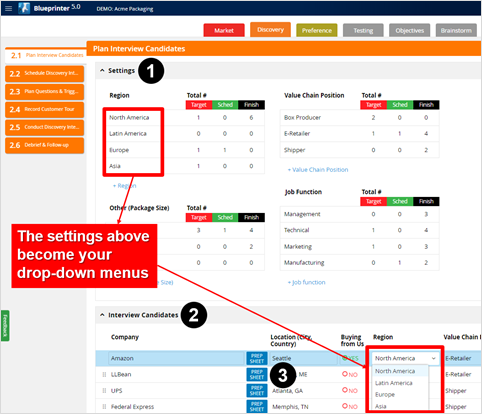
The second area to complete is “Interview Candidates.” Enter any company you might want to interview. You’ll see that your entries in the “Settings” section above have become your drop-down menus (to select the proper “region,” for instance). On the right side of this table, you can also keep track of the status of each interview candidate:
- Not targeted
- Targeted
- Scheduled (on our calendars)
- Finished
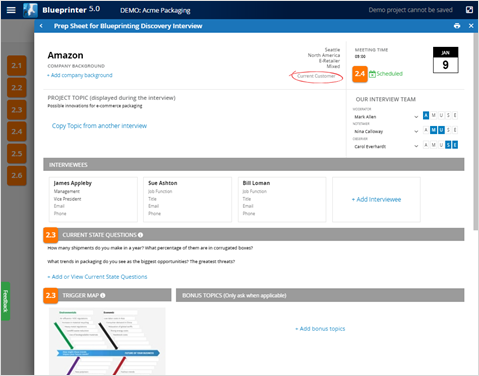
The third area for planning is the Prep Sheet on each Interview Candidate row. This is where you enter specific information for the Discovery interview you plan to conduct with this company:
- Meeting date & time
- Company background info
- Project topic (scope)
- Our interview team
- Customer attendees
- Current state questions (to begin)
- Trigger map (to prompt more outcomes)
There’s also room in your Prep Sheet to capture more information after the interview, e.g. confidential team notes, conclusions, and next steps.
Now you're ready for a Discovery interview with the company identified in this Prep Sheet. When you get to the customer's location, just open Blueprinter Tool 2.5 and click the name of the company you'll interview. Once you see the white Discovery Noteboard sheet, it's OK to plug in your projector so the customers can see this screen.
You can access all Blueprinter Tools at www.blueprintingcenter.com > Blueprinter software.
Keywords: Discovery interview, interview candidates, Blueprinter Tool 2.1, settings, interviewee descriptors, Prep Sheet, regions, customer, customers’ customer, distributor, point in value chain, job function