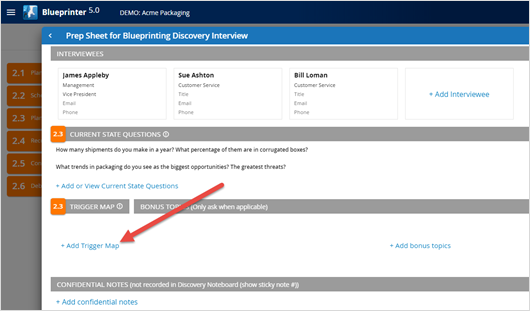
It’s not enough to create your Trigger Map(s) for your entire project (last article): Next you need to assign a certain Trigger Map to each Discovery interview you plan to conduct. Before the interview, go to Tool 2.1 or Tool 2.5 and open the Prep Sheet for the interview in question. About half-way down the Prep Sheet, click “+ Trigger Map” on the left side, and select your Trigger Map. This ensures it can be displayed during your Discovery Interview. Of course, you can pre-select different Trigger Maps for different
customers this way.
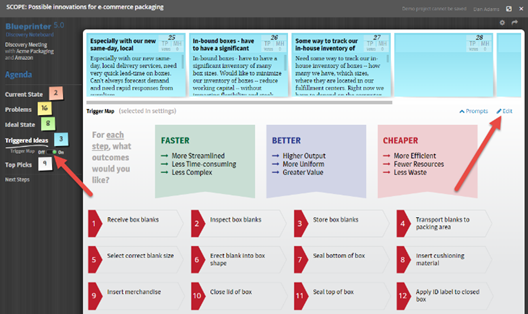
Now imagine you’re in a Discovery interview: When you’re done with the earlier parts of the Discovery interview (Current State, yellow Problems sticky notes, and green Ideal State sticky notes), click “Triggered Ideas” in the left panel. This will turn the remaining sticky notes blue. Then click the Trigger Map toggle switch (just below in the left panel) to “on” to display the Trigger Map you selected in the Prep Sheet for this interview.
Now you’re ready to use your Trigger Map. These tips may help:
- Before you start recording customer outcomes in blue sticky notes, it’s a good idea to ask the customer to help you update the Trigger Map. Click the “Edit” button in the upper right: Now you can add or modify steps in an Outcomes Map… add more trends in a Trends Map… and so on. Click “Done Editing” when you’re finished with these modifications.
- When you start recording their outcomes in blue sticky notes, you might want to focus their attention on one section of your Trigger map at a time. For instance you could begin by focusing them on just ways to increase sales (Benefits Map)… on just the Demographic Trends (Trends Map)… or just the first 5 steps in your process (Outcomes Map).
- You may also find it helpful to give customers a few minutes of “quiet time” to look over the Trigger Map and privately write down some of their outcomes… before you begin recording their outcomes with the entire group.
You saw how to create Trigger Maps in the last BlueHelp article, Creating Trigger Maps for Discovery interviews. You'll learn strategies for their use in the next BlueHelp article, Trigger Map strategies. For more on Discovery interviews, see e-Learning Module 15: Discovery interviews at www.blueprintingcenter.com > e-Learning.
Keywords: Trigger Maps, triggered ideas, fresh Discovery thinking, Benefits Map, Trends Map, Outcomes Map, blue sticky notes, Blueprinter Tool 2.1: Prep Sheet, edit Trigger Map